Thursday, October 22, 2009

Family Picture

I just got off the phone with one of my favorite friends in the world, Diane, who moved to Texas (without us) a few years ago, and she wanted to see a recent family photo, so here it is! We miss you Ludwigs, and hope to see you some day soon!

This picture was taken in August at our niece's wedding, and our oldest is a bridesmaid. Front row: Cami (7), Willie (12), Nikki (9). Back row: Megan (18), Mary Lynn, Mary A. (19), Will, and Lizzy (15). These ages are as of August (Mary & Nikki have had birthdays since).

Friday, October 16, 2009

BYU-I here we come!

Megan has been at college now for about 6 weeks, and is doing fabulously by the way, but I can't not post some fun pictures and tell you all how great that experience was! I totally thought I would be a mess leaving one of my babies so far away from home, but actually it was one of the coolest experiences of my life!

Meg is rooming with a classmate from Western HS, Larissa, and so she wasn't stressed too much about being lonely in Rexburg. But she did have a couple of sleepless nights just before we actually got there! ANTICIPATION. Will & I took her up, and we took 5 days to get there and back so we could take it slow and make it memorable. We stayed at Grandma & Grandpa Thornton's on the way up for a night, and at my sister Carol's home for a night, and just had so much fun visiting. We ended up kidnapping Aunt Carol and taking her with us to Rexburg, and what a blast having her with us! We spent the night before Megan could check in to her dorm in Idaho Falls, and our hotel was fabulous!!! We looked out our window, and saw the Idaho Falls Temple right there -- gorgeous.


Meg with Aunt Carol standing in front of the beautiful falls.
So here we are at Megan's dorm! We went there the night before to scope it out, and she knew she wanted to be early so she and Larissa could get the room that had best layout (sneaky girl!). And so we were there bright and early and...stood in line FOREVER in the cold to get her key. Well, she was the first one in because she couldn't get her picture taken for her ID because she was wearing flip flops -- BYU-I has strict regulations about what can be worn as a student, and flip flops are not approved -- go figure. But due to that oversight, she had to skip the pictures and so went right to the key line, and got to be first into her dorm. She was happy.

Their dorms are actually quite snazzy! 2 bedrooms, so only 4 room together -- that cuts out a lot of problems right away! I think it's easier to share a bathroom with less :) Plus they have a full living room and a nice size kitchen with lots of cupboard space! The bedrooms are cool because they get a full size desk under their bunks. Nothing like my dorm my first year at college. It is like a real apartment instead of a dorm. Made Mom (me) feel better about leaving her daughter to fend for herself! We stayed long enough to shop for food, get her groceries put away, help her & Larissa figure out how to make those top bunks up, and get her computer hooked up and functioning. Then we were out of there!

Below is the last picture I have of Meg in my mind, and it's a great one because she is where she should be. She has had this goal for such a long time, it is GREAT to see her accomplish getting to college. We are proud of you Meg!!!

More Stamp Camp Projects & Instructions

These Christmas cards are by Tiffany Christensen:
Supplies:
1) Garden Green- 4-1/4" x 11"
1) Merry Moments DSP piece- 4-1/4" x 2"
1) Very Vanilla Stamped piece- 3" x 3-1/4"
1) Real Red piece- 3-1/4" x 1"
1) Very Vanilla Taffeta ribbon
1) Real Red ornament with Dazzling Diamonds glitter

1- Fold big Garden Green Cardstock in half, using bone folder.
2- If you have a Garden Green Classic Stampin' Pad, use sponge and sponge around ornament opening,and down scallops for a little dimension.
3- Adhere DSP piece on the Garden Green Cardstock, about 1/4" from scallop edge.
4- Adhere Very Vanilla stamped sentiment piece onto Real Red piece, adhere with 2 dimensionals.
5- Adhere Real Red ornament through the opening on front.
6- Tie Very Vanilla Taffeta ribbon through opening and around to front, in a knot.
7- DONE!

Supplies:
1) Real Red Cardstock- 5-1/4" x 10-1/2"
1) Chocolate Chip Cardstock- 5" x 5"
1) Merry Moments Designer Series Paper Piece (Old Olive Poinsettia Patterned)- 4-3/4" x 4-3/4"
1) Chocolate Chip Cardstock- 4-3/4" x 2"
1) Merry Moments Designer Series Paper Piece (Snowflakes)- 4-3/4" x 1-7/8"
1) Real Red Cardstock- 2-1/2" x 2-3/4"
1) Very Vanilla Cardstock- 2-5/16" x 2-5/8"
1) Old Olive 5/8" Grosgrain Ribbon piece- 5"

Instructions:
1- Fold big Real Red Cardstock in half, using a bone folder.
2- Adhere Old Olive DSP square onto Chocolate Chip square.
3- Adhere that onto the Real Red Cardstock, centered.
4- Adhere snowflake rectangle DSP onto Chocolate Chip rectangle, lining up the edges.
5- Using good ribbon scissors that are sharp, cut out notches in the Old Olive ribbon, using the snowflake DSP to measure howlong you need it. Adhere ribbon onto snowflake and chocolate chip rectangle with SNAIL adhesive (works the best for ribbon).
6- Using 1/16" punch, or paper piercer, punch holes through ribbon, DSP and chocolate chip rectangle in the "V" and set silver brads through.
7- Adhere that whole rectangle with ribbon onto the card front.
8- Cut out 3 little red flowers, adhere onto Chocolate Chip stamped rectangle, over the chocolate chip ones.
9- Adhere Old Olive snowflake with dimensional over the chocolate chip stamped one.
10- Adhere Very Vanilla rectangle with flowers and snowflake onto the Real Red Cardstock piece.
11- Done!


Finally Back On My Blog!!!

OK, so I'm a slacker in the blog department, BUT not in all departments! For the record, since I posted last, we've taken a daughter to college, are living through getting another one back to college in the next couple of months, and I'm running back and forth between high school volleyball games and Stampin' Up events, ALL of which I LOVE, but all of which have kept me going so fast that I literally barely have time to read my e-mails it seems like! But I know that fall is busy for all of you, so I hope this explanation hasn't fallen on totally deaf ears. I apologize, and more will come more often now, I promise.
The "Got Ink?" Girlz Stampin' Up group just held our first stamp camp, and it was a blast! We learned much, and hope that all attendees had a great time (surveys should be coming soon -- please those of you who came, will you fill them out promptly?). These pictures and instructions are for those who could not attend last Saturday, but who bought the projects pre-stamped and need to put them together. The instructions may include stamping instructions as well, but you know that yours are already stamped for you!! Yay! Here are most of the projects and how to put them together:
This card was done by Debbie Carlson, and she took it from a Convention swap:
1. Adhere thin Chocolate Chip strip to bottom of Sahara Sand cardstock.
2. (Optional) Paper pierce right hand top corner of Sahara Sand.
3. Apply Snail adhesive to metal brad. Stick Old Olive circle onto brad. Take clear done top and apply directly to brad. Use tip of scissors or 1/16" punch to make a small hole in the center of the medallion stamped image. Put brad through and fasten.
4. Use adhesive to apply Sahara Sand piece to Old Olive base. Match up the medallion on Old Olive to medallion on Sahara Sand.

This is my home decor project, and here are the instructions:
Give Thanks Home Decoration
1. Adhere (1) 3 ½” X 11 and (1) 3 ½” X 10 ½” piece of Always Artichoke cardstock together with sticky strip.
2. (Optional) Punch 2 sides of beginning & end pieces of Designer Series Paper with ticket punch.
3. Wrap ribbon around last letter.
4. Adhere DSP to Artichoke cardstock panels, then letters on to the DSP.
5. Ink up “Give” and leaves only on “Give thanks” stamp with Elegant Eggplant & More Mustard Markers respectively. Breathe on stamp to remoisten, and stamp on vanilla cardstock. Punch out with large oval punch.
6. Sponge Soft Suede ink around edge of punched oval. Punch Scallop Oval out of More Mustard cardstock. Adhere two pieces together. Attach to front top panel of project with dimensionals.

Here are the panels so that you can see where I put my DSP. Obviously you can do whatever you want with it! I hope you love it like I do!


I also did one that says FAMILY. I love it too! Some of you chose this one instead of the THANKS, so here are pictures. The same directions above apply.


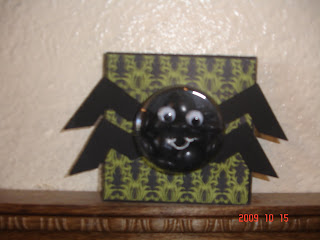
This cute Spider Treat 3X3 card was made by Tami Melancon. So very CUTE!
1. Fold Black cardstock in half
2. Fill treat cup with m&m's.
3. Put adhesive on the designer paper. (works best with snail adhesive)
4. Slide designer paper over the treat cup. (be sure to watch for the side that you want showing.
5. Adhere the designer paper to the black cardstock. Don't spill your m&m's :)
6. Trim legs to fit around the treat cup, and adhere.7. Adhere the googlie eyes for face and draw a smile with a white gel pen.

This adorable Gift Bag & Card were made by Melissa Diaz, and it is SO cute in real life. My picture truly does not do it justice (as goes for many of these pictures). The card slips into a clear envelope that is attached to the front of the bag. Talk about functional art!
Birthday Card:
1. Fold Cocoa Paper on score line to form card base
2. Adhere green ribbon across Rose Red paper and tape in back. Adhere rose red paper to front of card
3. Layer three yellow flowers adhering on top of each other. Apply the rose red dot shiny side out for center of flower.
4. Adhere white birthday stamp paper on top of Old Olive matt... Adhere to bottom left front of card.
5. Slide into clear envelope. Take red backing off stickystrip and adhere envelope to center front of bag.
6. Tie so saffron and rose red ribbon to handles of bag

These gorgeous scrapbook pages are by Susan Ornelas, and instructions will come soon. I'll add them in as soon as I get them.

This adorable lion baby card was designed by Jennifer Nebeker, and instructions will be posted soon as well, as well as her bird card and its instructions.
Coming soon are pictures of Tami's Build-A-Bear magnetic tin, my CASED Frankenstein matchbook card, and Tiffany's Christmas Cards. Tonight or tomorrow more will be posted!

Thursday, August 27, 2009

More Swap Pictures

Ok, before I get to the swap pics, I have to show the projects we did at my SU Open House! The two white cards are the "2-minute" cards that we did, and the "hello" card and box are projects that we made at Convention. Below, my favorite swaps from other Demonstrators at convention. The card at the top right is an "over-the-top" card made by my downline, Susan O. It is gorgeous! Click on the picture to see them better.
These are the 3-D projects that we swapped as a downline group at Convention. This beautiful bag was made by Nena (gotta love Pomegranite & Brown!). It holds a lot, and Nena gave us all lotion in it. Emily made the gift bag with Flower Fusion felt. So fun -- way to take a plain gift bag and glam it up Emily!
This is an Altoid case decorated and made into the cutest mini-scrapbook ever! I've always wanted one of these, and now I have something I can put in my purse and show everyone my kids, my friends, and my craft! This was made by Tiffany -- so glad you are in our group -- it's about time :)
Somehow I got a fuzzy picture, but this is a great page by Tami. She used the new Halloween rub-ons, and they make the page!
Super-cute page Emily! Gotta love the Simply Scrappin' packs -- they make quick, cute pages by the dozen. Literally, I've seen 12-20 pages come out of a Simply Scrappin' pack + 1 extra pack of 12 X 12. A bargain!
This page is by Susan, and I love the bling! The close-up below has a shot of those spooky eyes. We only had to do a single page for our swap, but she is going to add another page during her stamp club, and I can't wait to post that one too!
I'm going to say again that I'm sorry that some of the pictures are blurry! Hopefully you'll get the idea though, and if you need a sharper picture, say so in your comments, and I'll let you know when my camera is going again so I can get a better picture. Once again, click on the pics for a much bigger, more detailed (and today, sometimes much blurrier!) shot.
This was my swap, and I did a double-page spread because we had one demonstrator who couldn't come at the last minute. I used the bulk kit that we as demonstrators could order, and I fell in love with this kit! Too bad that I waited until it retired to get going with it. I should have done a class! The pictures are of our youngest daughter, Cami, as she ran to catch up with our truck on the farm in Utah. She was so happy and cute as she ran that I had to take a bunch of pictures -- now I'm glad I did!
Materials: Sunshine Garden Bulk Buy Kit (You can still order this if you are a demonstrator).
Lots of Letters chipboard, Hearts & Brackets Die, Big Shot, Sell-a-bration paper (retired)
I need to give credit where it is due -- I cased this layout from "roseluvseric" at Split Coast this spring.

This beautiful page was done by Jen Neb using DSP that I didn't buy (retired) and now I'm scavenging to find some -- I love her ornaments! Also, notice the close-up of her tree. I know it's blurry, but what an original way to make the funnest Christmas tree ever! I'm copying!

She used the scallop edge punch, and just hand-trimmed it because, "you don't want your edges perfect, right?" (Jen's words, and she's right!) Scallops are edged with ink and glittered. So so so pretty in real life!
Nena's page, and it's the one all my kids "have to have". They love the cupcake, and how could you not? She crimped the bottom, crystal effected the dots in the frosting, and glittered the cherry to the max! With a little simplification, what a fun kids class this would make, right?

Ok, Melissa, I know that your page isn't on here, but my camera died, and I can't find the charging cable (haven't seen it since Convention), but as soon as I find it, I'll get all of our pictures on here! Sometimes I feel like a scatter-brain, but today I figured I'd get on what I had! Hope you all enjoy these great ideas, and that they motivate you to GET STAMPING!!!

Stampin' Up Convention '09 & My 1st Open House

Convention 2009 was such fun, and I came back saturated with new ideas and all fired up to make this the best year ever as far as Stampin' Up goes! I've resolved to be a better leader, and to share more of what we can do with stamps with others. I have so many homemade gift ideas thanks to our downline swap, and all the classes we attended at Convention, that I cannot imagine why I would have to buy a single gift! Well, at least for the women & girls in my life :) But how nice to be able to make wall art, card gift boxes, tags and albums -- things we all use and love -- for a fraction of what we buy them for! And ours are usually just as cute if not cuter! It makes me happy. So, here are just some of our downline swaps, and I will be posting more, but other pics wouldn't download right now, so here are these for now.
These adorable tags were made by Melissa D. and are so so so cute in real life!!! They make me start wanting to wrap right now, just so I can see these adorable tags swinging from the presents! Way to use the Catalog for this idea from page14 (Hostess set! --great reason to have a workshop!) in our Idea Book & Catalog.
This beautiful treasure box was made by Tami M., and I love it more than words can say! Our rules in our downline convention swap was that we could use any of our retired stuff so that we could use it up! And my girls did an awesome job! Tami made every box out of different paper, and each one had a unique top. I'm truly in awe of my downline's creativity! They are the best.


We also swapped 12 X 12 pages, and this was Tiffany C.'s page. It is so fun that I put it on the front of my family album. I would have had pictures already on it, but I'm out of one ink color, so of course my printer won't work! Hate it when that happens. Anyway, it will soon look super-cute with all the pictures on it -- don't you love the mini-album below?!!! Tiffany was a first-time convention go-er, and her swaps were fab. Keep up the great work Tiff!

At Convention, every year they do a game show (I was actually a contestant 2 years ago in Denver, and won $250 in merchandise out of the catalog!), and it is one of my favorite things because they always make it Stampin' Up related of course. This year they did a take-off of Family Fued, calling it "Demo Duel" and it was way fun. Some of the questions were: "What in the catalog is made of paper?" ('The catalog' was the last answer!), "Name a SU color that starts with 'B'," and "What animal is represented by any retired or current stamp set?" It was so much fun.

I'll have more pics from Convention later. I'm just getting my act together here in Las Vegas -- being away for most of the summer means lots to get done when we're back to get ready for school, college, etc. So I'm just getting my pics downloaded, communicating with my downline so I can get some of their pictures (One day I forgot my camera -- how can you do that?), and basically trying to catch up on life! The picture below shows an adorable album that the ladies in the row behind us made, and Melissa & Nena are showing how the half-circle lifts up -- can't say it enough that ideas are just waiting to be thought up, and we are so glad that lots of them showed up at Convention '09.
The one thing that I have done since I've been home that has to do with Stampin' Up is hold my first Open House! It was a great time, and I had the privelege to show some new customers how the Big Shot works, and of course all the ins and outs of many of our basic great products. I always love watching people figure out how our ink pads open (and realize that they last for so long since they are airtight!) and how our glue sticks work. They loved the sample board -- thanks to all who made these cute swaps -- they are all straight from convention.
This is my great friend Leanne who agreed to be in the picture with the display board -- she is such a sport! Below is a sample of how my table was set up so that hopefully my customers could follow instructions to make that fun box (it does actually hold 8 Hershey nuggets!).